4. Installation
4.1. EDGE Installation
Note
A base install is ~8GB for the code base and ~177GB for the databases.
Please ensure that your system has the essential software building packages. installed properly before proceeding following installation.
Download the codebase, databases and third party tools.
## Codebase is ~68Mb and contains all the scripts and HTML needed to make EDGE run
wget -c https://edge-dl.lanl.gov/EDGE/1.1/edge_main_v1.1.1.tgz

## Third party tools is ~1.9Gb and contains the underlying programs needed to do the analysis
wget -c https://edge-dl.lanl.gov/EDGE/1.1/edge_v1.1_thirdParty_softwares.tgz

## Pipeline database is ~7.9Gb and contains the other databases needed for EDGE
wget -c https://edge-dl.lanl.gov/EDGE/1.1/edge_pipeline_v1.1.databases.tgz

## GOTTCHA database is ~14Gb and contains the custom databases for the GOTTCHA taxonomic identification pipeline
wget -c https://edge-dl.lanl.gov/EDGE/1.1/GOTTCHA_db_for_edge_v1.1.tgz

## BWA index is ~41Gb and contains the databases for bwa taxonomic identification pipeline
wget -c https://edge-dl.lanl.gov/EDGE/1.1/bwa_index1.1.tgz

## NCBI Genomes is ~8Gb and contain the full genomes for prokaryotes and some viruses
wget -c https://edge-dl.lanl.gov/EDGE/1.1/NCBI_genomes_for_edge_v1.1.tar.gz
Warning
Be patient; the database files are huge.
Unpack main archive:
tar -xvzf edge_main_v1.1.1.tgz
Note
The main directory, edge_v1.1.1, will be created.
Move the database and third party archives into main directory (edge_v1.1.1):
mv edge_v1.1_thirdParty_softwares.tgz edge_v1.1.1/
mv edge_pipeline_v1.1.databases.tgz edge_v1.1.1/
mv GOTTCHA_db_for_edge_v1.1.tgz edge_v1.1.1/
mv bwa_index1.1.tgz edge_v1.1.1/
mv NCBI_genomes_for_edge_v1.1.tar.gz edge_v1.1.1/
Change directory to main directory and unpack databases and third party tools archive:
cd edge_v1.1.1

# unpack third party tools
tar -xvzf edge_v1.1_thirdParty_softwares.tgz

# unpack databases
tar -xvzf edge_pipeline_v1.1.databases.tgz
tar -xvzf GOTTCHA_db_for_edge_v1.1.tgz
tar -xzvf bwa_index1.1.tgz
tar -xvzf NCBI_genomes_for_edge_v1.1.tar.gz
Note
To this point, you should see a database directory and a thirdParty directory in the main directory
Installing pipeline:
./INSTALL.sh
It will install the following depended tools.
- Assembly
- idba
- spades
- Annotation
- prokka
- RATT
- tRNAscan
- barrnap
- BLAST+
- blastall
- phageFinder
- glimmer
- aragorn
- prodigal
- tbl2asn
- Alignment
- hmmer
- infernal
- bowtie2
- bwa
- mummer
- Taxonomy
- kraken
- metaphlan
- kronatools
- gottcha
- Phylogeny
- FastTree
- RAxML
- Utility
- bedtools
- R
- GNU_parallel
- tabix
- JBrowse
- primer3
- samtools
- sratoolkit
- Perl_Modules
- perl_parallel_forkmanager
- perl_excel_writer
- perl_archive_zip
- perl_string_approx
- perl_pdf_api2
- perl_html_template
- perl_html_parser
- perl_JSON
- perl_bio_phylo
- perl_xml_twig
- perl_cgi_session
- Restart the Terminal Session to allow $EDGE_HOME to be exported.
Note
After running INSTALL.sh successfully, the binaries and related scripts will be stored in the ./bin and ./scripts directory. It also writes EDGE_HOME environment variable into .bashrc or .bash_profile.
4.1.1. Testing the EDGE Installation
After installing the packages above, it is highly recommended to test the installation:
> cd $EDGE_HOME/testData
> ./runAllTest.sh
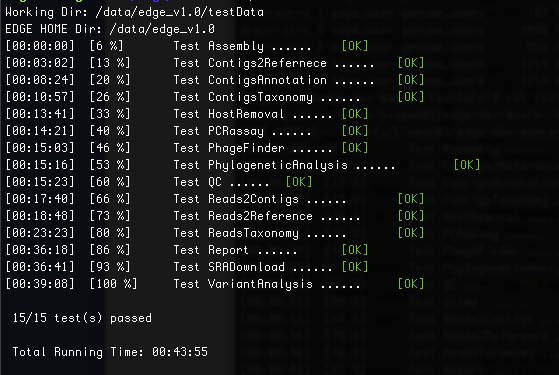
There are 15 module/unit tests which took around 44 mins in our testing environments. (24 cores 2.60GHz, 512GB ram with Ubuntu 14.04.3 LTS ). You will see test output on the terminal indicating test successes and failures. Some tests may fail due to missing external applications/modules/packages or failed installation. These will be noted separately in the $EDGE_HOME/testData/runXXXXTest/TestOutput/error.log or log files in each modules. If these are related to features of EDGE that you are not using, this is acceptable. Otherwise, you’ll want to ensure that you have the EDGE installed correctly. If the output doesn’t indicate any failures, you are now ready to use EDGE through command line. To take advantage of the user friendly GUI, please follow the section below to configure the EDGE Web server.
4.1.2. Apache Web Server Configuration
Install apache2
For Ubuntu

> sudo apt-get install apache2

For CentOS

> sudo yum -y install httpd
Enable apache cgid, proxy, headers modules:
For Ubuntu

> sudo a2enmod cgid proxy proxy_http headers
Modify/Check sample apache configuration file:
Double check $EDGE_HOME/edge_ui/apache_conf/edge_apache.conf alias directories to match EDGE
installation path at line 2,3,13,14,26,51.
The default is configured as http://localhost/edge_ui/ or http://www.yourdomain.com/edge_ui/
(Optional) If users are behind a corporate proxy for internet:
Please add proxy info into $EDGE_HOME/edge_ui/apache_conf/edge_apache.conf or $EDGE_HOME/edge_ui/apache_conf/edge_httpd.conf

# Add following proxy env
SetEnv http_proxy http://yourproxy:port
SetEnv https_proxy http://yourproxy:port
SetEnv ftp_proxy http://yourproxy:port
Copy modified edge_apache.conf to the apache or Insert content into httpd.conf
For Ubuntu

> cp $EDGE_HOME/edge_ui/apache_conf/edge_apache.conf /etc/apache2/conf-available/
> ln -s /etc/apache2/conf-available/edge_apache.conf /etc/apache2/conf-enabled/

For CentOS

> cp $EDGE_HOME/edge_ui/apache_conf/edge_apache.conf /etc/httpd/conf.d/
Modify permissions: modify permissions on installed directory to match apache user
For Ubuntu 14, the user can be edited at /etc/apache2/envvars and the variable are APACHE_RUN_USER and APACHE_RUN_GROUP.

For CentOS, the user can be edited at /etc/httpd/conf/httpd.conf and the variable are User and Group.

> chown -R xxxxx $EDGE_HOME/edge_ui  $EDGE_HOME/edge_ui/JBrowse/data  #(xxxxx is the APACHE_RUN_USER value)

> chgrp -R xxxxx $EDGE_HOME/edge_ui  $EDGE_HOME/edge_ui/JBrowse/data  #(xxxxx is the APACHE_RUN_GROUP value)
Restart the apache2 to activate the new configuration
For Ubuntu

>sudo service apache2 restart

For CentOS

>sudo httpd -k restart
4.1.3. User Management system installation
Create database: userManagement:
> cd $EDGE_HOME/userManagement
> mysql -p -u root
mysql> create database userManagement;
mysql> use userManagement;
Note
make sure mysql is running. If not, run “sudo service mysqld start”.;
for CentOS7: “sudo systemctl start mariadb.service && sudo systemctl enable mariadb.service”
Load userManagement_schema.sql:
mysql> source userManagement_schema.sql;
Load userManagement_constrains.sql:
mysql> source userManagement_constrains.sql;
Create an user account
   username: yourDBUsername
   password: yourDBPassword
   (also modify the username/password in userManagementWS.xml file)
and grant all privileges on database "userManagement" to user yourDBUsername

mysql> CREATE USER 'yourDBUsername'@'localhost' IDENTIFIED BY 'yourDBPassword';

mysql> GRANT ALL PRIVILEGES ON userManagement.* to 'yourDBUsername'@'localhost';

mysql>exit;
Configure tomcat:
* Copy mysql-connector-java-5.1.34-bin.jar to /usr/share/tomcat/lib/

    For Ubuntu and CentOS6
    > cp mysql-connector-java-5.1.34-bin.jar /usr/share/tomcat7/lib/
    For CentOS7
    > cp mariadb-java-client-1.2.0.jar /usr/share/tomcat/lib/

* Configure tomcat basic auth to secure /user/admin/register web service
  add lines below to /var/lib/tomcat7/conf/tomcat-users.xml of Ubuntu or /etc/tomcat/tomcat-users.xml of CentOS

    <role rolename="admin"/>
    <user username="yourAdminName" password="yourAdminPassword" roles="admin"/>

    (also modify the username and password in createAdminAccount.pl file)

* Inactive timeout in /var/lib/tomcat7/conf/web.xml or /etc/tomcat/web.xml (default is 30mins)

    <!--  <session-config>
        <session-timeout>30</session-timeout>
    </session-config> -->

* add the line below to tomcat /usr/share/tomcat7/bin/catalina.sh of Ubuntu or /etc/tomcat/tomcat.conf of CentOS to increase PermSize:

    JAVA_OPTS=" -Xms256M -Xmx1024M -XX:PermSize=256m -XX:MaxPermSize=512m"

* Restart tomcat server

    for Ubuntu
    > sudo service tomcat7 restart
    for CentOS6
    > sudo service tomcat restart
    for CentOS7
    > sudo systemctl restart tomcat.service

* Deploy userManagementWS to tomcat server

    for Ubuntu
    > cp userManagementWS.war /var/lib/tomcat7/webapps/
    > cp userManagementWS.xml /var/lib/tomcat7/conf/Catalina/localhost/
    for CentOS
    > cp userManagementWS.war /var/lib/tomcat/webapps/
    > cp userManagementWS.xml /etc/tomcat/Catalina/localhost/

    (for CentOS7. The userManagementWS.xml needs to modify the sql connector where driverClassName="org.mariadb.jdbc.Driver")

* Deploy userManagement to tomcat server

    for Ubuntu
    > cp userManagement.war /var/lib/tomcat7/webapps
    for CentOS
    > cp userManagement.war /var/lib/tomcat/webapps

* Change settings in /var/lib/tomcat7/webapps/userManagement/WEB-INF/classes/sys.properties of Ubuntu.
                    /var/lib/tomcat/webapps/userManagement/WEB-INF/classes/sys.properties of CentOS.

    host_url=http://www.yourdomain.com:8080/userManagement
    email_sender=admin@yourdomain.com
    email_host=mail.yourdomain.com
Note
- tomcat files in /var/lib/tomcat7 & /usr/share/tomcat7 for Ubuntu
- in /var/lib/tomcat & /usr/share/tomcat & /etc/tomcat for CentOS
The tomcat server will automatically decompress the userManagementWS.war and userManagement.war ;
Setup admin user:
* run script createAdminAccount.pl to add admin account with encrypted password to database

    > perl createAdminAccount.pl -e admin@my.com -p admin -fn <first name> -ln <last name>
Configure the EDGE to use the user management system
- edit $EDGE_HOME/edge_ui/cgi-bin/edge_config.tmpl where user_management=1
Note
If user management system is not in the same domain with edge. ex: http://www.someother.com/userManagement The parameter: edge_user_management_url=http://www.someother.com/userManagement
Enable social (facebook,google,windows live, Linkedin) login function
- edit $EDGE_HOME/edge_ui/cgi-bin/edge_config.tmpl where user_social_login=1
- modify $EDGE_HOME/edge_ui/cgi-bin/edge_user_management.cgi at line 108/109 of the admin_email and password according to #6 above.
- modify $EDGE_HOME/edge_ui/javascript/social.js, change apps id you created on each social media.
Note
You need to register your EDGE’s domain on each social media to get apps id. e.g.: A FACEBOOK app needs to be created and configured for the domain and website set up by EDGE. see https://developers.facebook.com/ and StackOverflow Q&A
Optional: configure sendmail to use SMTP to email out of local domain:
* edit /etc/mail/sendmail.cf and edit this line:

    # "Smart" relay host (may be null)
    DS

* and append the correct server right next to DS (no spaces);

    # "Smart" relay host (may be null)
    DSmail.yourdomain.com

* Then, restart the sendmail service

    > sudo service sendmail restart
4.2. EDGE Docker image
EDGE has a lot of dependencies and can (but doesn’t have to) be very challenging to install. The EDGE docker gets around the difficulty of installation by providing a functioning EDGE full install on top of offical Ubuntu 14.04.3 LTS. You can find the image and usage at docker hub.
4.3. EDGE VMware/OVF Image
You can start using EDGE by launching a local instance of the EDGE VM. The image is built by VMware Fusion v8.0. The pre-built EDGE VM is provided in Open Virtualization Format (OVA/OVF) which is supported by major virtualization players, such as VMware / VirtualBox / Red Hat Enterprise Virtualization, etc. Unfortunately, this may not always work perfectly, as each VM technology seems to use slightly different OVA/OVF implementations that aren’t entirely compatible. For example, the auto-deploy feature and the path of auto-mount shared folders between host and guest which are used in the EDGE VMware image may not be compatible with other VM technologies (or may need advanced tweaks). Therefore, we highly recommended using VMware Workstation Player which is free for non-commercial, personal and home use. The EDGE databases are not included in the image. You will need to download and mount the databases, input and output directories after you launch the VM. Below are instructions to run EDGE VM on your local server:
- Install VMware Workstation player .
- Download VM image (EDGE_vm_RC1.ova) from LANL FTP site.
- Download the EDGE databases and follow instruction to unpack them.
- Configure your VM
- Allocate at least 10GB memory to the VM
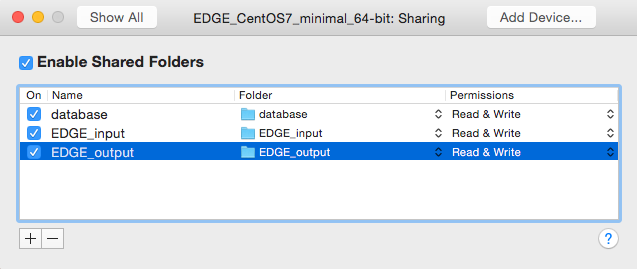
- Share the database, input and output directory to the “database”, “EDGE_input” and “EDGE_output” directory in the VM guest OS. If you use VMware, the “Sharing settings” should look like:
- Start EDGE VM.
- Access EDGE VM using host browser (http://<IP_OF_VM>/edge_ui/).
Note that the IP address will also be provided when the instance starts up.

- Control EDGE VM with default credentials.
- OS Login: edge/edge
- EDGE user: admin@my.edge/admin
- MariaDB root: root/edge